Vert.x 3 Web easy as Pi
Vert.x Web distinguishes itself from traditional application servers like JavaEE by just being a simple extension toolkit to Vert.x, which makes it quite lightweight and small but nevertheless very powerful.
One can create simple applications targeting small devices such as Raspberry Pi without having to write much code but still very fast as it is expected from any Vert.x application.
Let’s for example think of making a realtime cpu load visualization web app. For this example we need a few things:
- a MXBean to collect CPU load
- a HTTP server (to serve the static resources and host our app)
- a SockJS server to provide realtime updates
- a SockJS to EventBus bridge to pass messages around
- some visualization JS library
- a bit of coding
To bootstrap this project we start by creating the pom.xml file. A good start is always to consult the examples, and you should end up with something like:
...
<groupId>io.vertx.blog</groupId>
<artifactId>rpi</artifactId>
<version>1.0</version>

<dependencies>
  <dependency>
    <groupId>io.vertx</groupId>
    <artifactId>vertx-core</artifactId>
    <version>3.0.0</version>
  </dependency>

  <dependency>
    <groupId>io.vertx</groupId>
    <artifactId>vertx-web</artifactId>
    <version>3.0.0</version>
  </dependency>
</dependencies>
...
At this moment you can start coding the application using the standard maven source src/main/java and resource
src/main/resources locations. And add a the class io.vertx.blog.RpiVerticle
to the project:
public class RPiVerticle extends AbstractVerticle {

  private static final OperatingSystemMXBean osMBean;

  static {
    try {
      osMBean = ManagementFactory.newPlatformMXBeanProxy(ManagementFactory.getPlatformMBeanServer(),
          ManagementFactory.OPERATING_SYSTEM_MXBEAN_NAME, OperatingSystemMXBean.class);
    } catch (IOException e) {
      throw new RuntimeException(e);
    }
  }

  @Override
  public void start() {

    Router router = Router.router(vertx);

    router.route("/eventbus/*").handler(SockJSHandler.create(vertx)
        .bridge(new BridgeOptions().addOutboundPermitted(new PermittedOptions().setAddress("load"))));

    router.route().handler(StaticHandler.create());

    vertx.createHttpServer().requestHandler(router::accept).listen(8080);

    vertx.setPeriodic(1000, t -> vertx.eventBus().publish("load",
        new JsonObject()
            .put("creatTime", System.currentTimeMillis())
            .put("cpuTime", osMBean.getSystemLoadAverage())));
  }
}
So let’s go through the code, first in the static constructor we initialize the MXBean that will allow us to collect
the current System Load Average, then on the start method we create a Vert.x Web Router and define that for all
requests starting with /eventbus should be handled by the SockJS server, which we then bridge to the Vert.x
EventBus and allow outbound messages addressed to the load address.
Since our application is a web application we will also server some static content with the StaticHandler and we
finally start a HTTP server listening on port 8080.
So now all we are missing is a way to push real time data to the client so we end up creating a Periodic task that
repeats every 1000 milliseconds and sends some JSON payload to the address "load".
If you run this application right now you won’t see much since there is no frontend yet, so let’s build a very basic index.html:
...
var eb = new vertx.EventBus(window.location + "eventbus");

eb.onopen = function () {
  eb.registerHandler("load", function (msg) {
    if (data.length === 25) {
      // when length of data equal 25 then pop data[0]
      data.shift();
    }
    data.push({
      "creatTime": new Date(msg.creatTime),
      "cpuTime": msg.cpuTime
    });
    render();
  });
};
...
Let’s walk again the code, we start by opening a EventBus bridge over SockJS and register a handler data to consume
messages sent to that address. Once such a message arrives we do some house keeping to avoid filling our browser memory
and then add the incoming message to the data queue and triger a rendering of the data. There is however one interesting
issue here, since the message payload is JSON there is no native support for Date objects so we need to do some
parsing from what arrives from the server. In this case the server sends a simple time since epoch number, but one can
choose any format he likes.
At this moment you can build and package your app like mvn clean package, then deploy it to your raspberrypi like:
scp target/rpi-1.0-fat.jar pi@raspberrypi:~/ and finally run it: java -jar rpi-1.0-fat.jar.
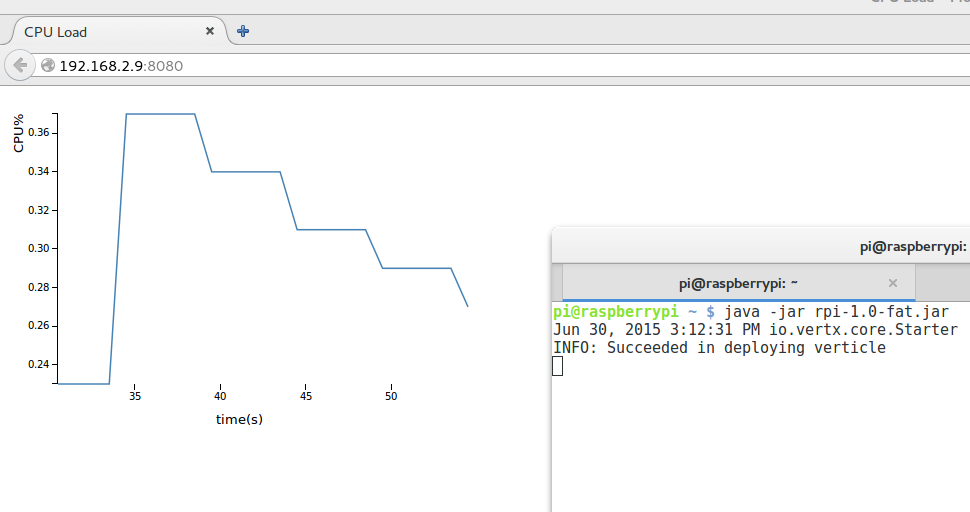
Open a browser to see the realtime graph!


